A useful way through
- Draw the usable wall. Record width, nearby doors, switches, furniture and anything that changes how the work is viewed. Identify the normal viewing position. A photograph of an empty wall can conceal obstacles and scale.
- Measure the outside of each frame, not only the image. Decide whether the set shares a top edge, centre line or another deliberate alignment. Write down the gaps rather than relying on a product photograph to imply the spacing.
- Calculate the whole group. Add all frame widths and the gaps for the chosen arrangement. Check its relationship with the usable wall and furniture. If the group is too wide, reconsider the arrangement or frame sizes before buying.
- Make a full-size paper mock-up and view it from the intended positions. Use a surface-safe temporary method suitable for the wall. Keep the preferred layout with dimensions. Ask a competent installer about the actual wall, frame weight and fixings; the paper plan does not specify anchors.
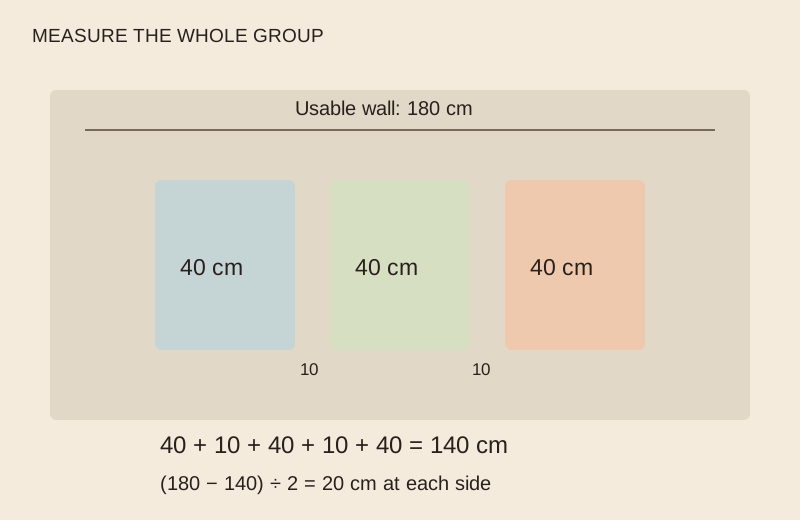
Read the map as text
MEASURE THE WHOLE GROUP · Usable wall: 180 cm · 40 cm · 40 cm · 40 cm · 10 · 10 · 40 + 10 + 40 + 10 + 40 = 140 cm · (180 − 140) ÷ 2 = 20 cm at each side
- Wall and furniture measurements
- Outer frame dimensions
- Spacing and alignment
- Full-size paper mock-up
Put it into practice
Three frames each 40 cm wide with two 10 cm gaps create a 140 cm group. Centring that group on a usable 180 cm wall leaves 20 cm at each side: (180 − 140) ÷ 2. If a switch occupies one of those margins, the usable area needs revisiting. The diagram is an illustrative dimension plan, not a recommendation for every room.
Illustrative example, not a reported client project or test.
Your take-away checklist
Plan an artwork grouping at its real size
- □ Wall and furniture measurements: ____________________
- □ Outer frame dimensions: ____________________
- □ Spacing and alignment: ____________________
- □ Full-size paper mock-up: ____________________
Before you act
Do not infer safe fixing type or load capacity from this layout. Consider glare, vulnerable surfaces and any conservation needs of the actual work. A reproduction and an original artwork can need different handling and display conditions.
Make a layout record
Sketch the wall, label the outer frame sizes, mark the chosen gaps and alignment, and note the viewing position. Keep a picture of the paper mock-up beside the dimensions so a later change can be compared.
Ask before purchasing
Confirm whether advertised dimensions describe the print, mount or outer frame. Check what is supplied, how it is finished and who handles installation. Do not treat a styled seller image as a measured installation drawing.
Sources & context
The earlier How To Choose Artwork Sets For Interior Decorating page was dated 2021-10-18. Its subject is developed here as a new procedure, with the original byline retained separately. This edition does not carry forward the page’s supplier recommendations or unsupported outcome claims.